Keeping a lush, green garden requires careful watering, but manually managing an irrigation system can be time-consuming and inefficient. What if your garden could water itself based on real-time weather data, soil moisture levels, or even your own schedule? With Home Assistant, automating irrigation becomes not only convenient but also smart—ensuring your plants get the right amount of water while conserving resources.
In this article, we’ll explore how to integrate your irrigation system with Home Assistant, leveraging sensors, schedules, and automation rules to create a fully autonomous setup. Whether you’re using smart valves, relays, or MQTT-based controllers, this guide will help you design a system that keeps your garden thriving with minimal effort. Let’s dive in!
🏡 Hardware
Before setting up automation, the first step is to carefully plan your irrigation system and choose the right components. Selecting a reliable brand ensures durability and compatibility with smart controllers. I opted for Hunter sprinklers and valves—a well-known manufacturer with strong local availability—but the approach described in this guide can be applied to virtually any irrigation system.
Regardless of the brand, the key is to integrate your system with Home Assistant, enabling automated schedules, weather-based adjustments, and remote control. With the right setup, you can achieve efficient watering while minimizing waste and effort.
Like most irrigation systems, solenoid valves typically require 24V AC power to open and close. This low-voltage setup is common in residential and commercial irrigation, ensuring safe and efficient operation.
Hunter valves operate with different power consumption depending on the frequency. To ensure proper functionality, I selected a transformer that meets these requirements:
– 350 mA inrush, 190mA holding, 60 Hz
– 370 mA inrush, 210mA holding, 50 Hz
⚠️ Important Notes:
Choosing the right transformer is crucial, as it needs to provide a stable 24V AC output to reliably activate the solenoid valves.
Before proceeding, make sure to check the specifications of your own valves and select a transformer that meets their power requirements.
⚡components
The following components are used in my case:
- 220v to 24V transformer ABB 2CSM228715R0802 (⚠️ select a proper one according to your valves summary power consumption).
- 24V AC valves
- Zigbee ON/OFF NodOn SIN-4-1-20.
- DIN-rail adapter


🔌 Wiring and Connecting the System
As shown in the diagram below, the wiring is straightforward. The transformer and switches should be powered by 220V, while the solenoid valves must be powered by the transformer’s 24V AC output through normally open dry-contact switches to ensure electrical isolation between the circuits.
When the switches are activated through Home Assistant, the irrigation system turns on, allowing water to flow through the selected zones. This setup ensures safe and efficient control of your irrigation system.
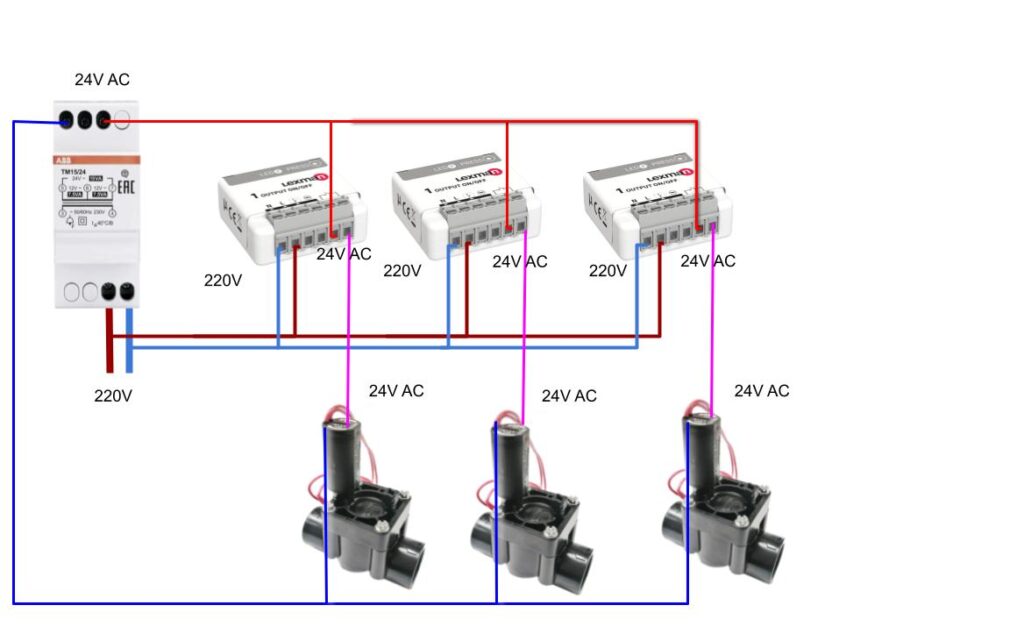
⚠️ Ensuring Electrical Safety
Please pay attention to the two circuit chains in the setup: 220V and 24V, which must be isolated to avoid any damage. As you can see, I separated both phases and neutrals using a transformer.
☝️TIP
I advise you to power on your switches and add them to Home Assistant one by one for a clear understanding of which exact zone is wired to exact switch. Otherwise, you will spend some time to distinguish which zone is wired to a switch later.
🔗 Home Assistant configuration
I believe you already have Zigbee integration configured in your Home Assistant setup. If not, please check out the following articles:
⏳ Configuring a Timer Helper
Using timers is crucial for maintaining an efficient and reliable irrigation system. Without proper timing, you risk overwatering or underwatering your plants, leading to wasted water and potential damage to your garden. By leveraging timers, you can automate watering schedules, ensuring that your plants receive the right amount of water at optimal times.
Timers also help prevent conflicts between different irrigation zones. Running multiple zones simultaneously can reduce water pressure and lead to inefficient coverage. By setting up sequential timers, you can stagger irrigation cycles, allowing each zone to get adequate water without compromising efficiency. Additionally, integrating timers with weather data can further optimize irrigation, ensuring that watering only occurs when necessary, such as avoiding irrigation during rainfall.
Go to Home Assistant Settings:
- Open Home Assistant and navigate to Settings → Devices & Services → Helpers.
- Click the “+ ADD HELPER” button in the bottom-right corner.
Create a Timer Helper:
- Select “Timer” from the list of helper types.
- Enter a descriptive name, such as
"Zone x Timer". - Set a default duration (e.g.,
30 minutesfor watering). - Click “Create” to save the helper.
- Repeat previose step for the each timer. The good approach is setting different icons for each timer for further ientificztion them.
⚠️ Important Notes:
The duration should be adjusted based on your soil type and moisture retention properties. Sandy soils drain quickly and may require shorter, more frequent watering cycles, whereas clay soils retain moisture longer and may need less frequent but longer irrigation periods. Adjust the Timer Helper settings accordingly to optimize water usage and ensure healthy plant growth.
⚙️ Configuring automations for timers
Automations are needed to open a valve when a timer is started and close it when a timer is stopped. To keep automations well-organized, it’s best to manage all actions for a specific device within a single automation. This approach reduces clutter and makes it easier to maintain. Instead of creating separate automations for opening and closing the valve, we’ll use multiple triggers and conditional actions.
- Go to Settings → Automations & Scenes.
- Click + ADD AUTOMATION and select Create New Automation.
- Set a Trigger for the started timer:
- Choose State as the trigger type.
- Select the timer entity (e.g.,
timer.irrigation_zone1 - replace it with your timer's name) - Set the From state to
idleand To state toactive. - Set the Trigger ID name “
irrigation_zone1.start"by clicking on the “triple-dot” menu of the trigger.
- Set a Trigger for the stoped timer:
- Choose State as the trigger type.
- Select the timer entity (e.g.,
timer.irrigation_zone1 - replace it with your timer's name) - Set the From
activestate to and To state toidle. - Set the Trigger ID name “
irrigation_zone1.stop"by clicking on the “triple-dot” menu of the trigger.
- Add an Action: → Select “Choose” type of action.
- Click on “Option 1“
- Add Condition → Triggered by → Triggered by →
irrigation_zone1.start(Trigger’s name from the step 3) - Add an Action inside the block of Option 1!
⚠️ Please don’t Add an Action outside of the block because it will be actioned regardless which trigger is activated!- Choose Device → Choose the name of your Zigbee switch which controls the irrigation valve.
- Choose the device’s action Turn on “your device name”.
- Add Condition → Triggered by → Triggered by →
- Click “Add “Option“
- Add Condition → Triggered by → Triggered by →
irrigation_zone1.stop(Trigger’s name from the step 4) - Add an Action inside the block of Option 2!
⚠️ Please don’t Add an Action outside of the block because it will be actioned regardless which trigger is activated!- Choose Device → Choose the name of your Zigbee switch which controls the irrigation valve.
- Choose the device’s action Turn off “your device name”.
- Add Condition → Triggered by → Triggered by →
- Click on “Option 1“
- Save your automation, switch to the yaml editor mode by clicking on the “triple-dot” menu of your automation and compare your script with the example below:
description: ""
mode: single
triggers:
  - trigger: state
    entity_id:
      - timer.irrigation_zone1
    from: idle
    to: active
    id: Irrigation_zone1_timer start
  - trigger: state
    entity_id:
      - timer.irrigation_drop
    from: active
    to: idle
    id: Irrigation_zone1_timer stop
conditions: []
actions:
  - choose:
      - conditions:
          - condition: trigger
            id:
              - Irrigation_zone1_timer start
        sequence:
          - type: turn_on
            device_id: b7778ec582f1600e4cdb731a21593774
            entity_id: 28f629bf57bb2ca6c28a1bca4a40e7de
            domain: switch
      - conditions:
          - condition: trigger
            id:
              - Irrigation_zone1_timer stop
        sequence:
          - type: turn_off
            device_id: b7778ec582f1600e4cdb731a21593774
            entity_id: 28f629bf57bb2ca6c28a1bca4a40e7de
            domain: switch
⚠️ Important Notes:
You will have your own names of triggers and devices.
7. Make a similar automation for each of your zones.
🎯 Why Use a Single Automation for a device?
- Keeps all related actions in one place.
- Makes troubleshooting and modifications easier.
- Reduces the number of automations cluttering Home Assistant.
🎛️ Creating a Home Assistant Dashboard for Irrigation
A dedicated Irrigation Dashboard in Home Assistant allows you to monitor and control your system efficiently. It provides an intuitive interface to check valve status, adjust timers, and integrate weather conditions.
I created a separate view of the default dashboard for the irrigation, but it depends on your preferences and needs.
Hence, chose more suitable option for you from the two below:
🖥️ Step 1: Create a New Dashboard
- Go to → Settings → Dashboards.
- Click + ADD DASHBOARD and name it Irrigation Control.
- Set it as Admin-Only (optional, for security).
🖥️ Step 1: Create a Separate View for Irrigation
- Open your dashboard.
- Click Edit on yourdashboard, then Add View.
- Name it Irrigation and choose a suitable icon (e.g., water or plant).
- Customize the view as needed—this view will contain all irrigation-related components, like timers, zone status, and weather info.
I recommend you install the custom timer-bar-card to create cards with an ongoing status of your irrigation zones as displayed in the picture below.
🎨 Step 2: Install the Custom Timer Bar Card
To improve your irrigation dashboard, consider using the Custom Timer Bar Card. This card will display the ongoing status of your irrigation zones, showing a visual representation of the active irrigation cycle.
Install the Timer Bar Card
- Navigate to HACS (Home Assistant Community Store) → Frontend.
- Search for timer-bar-card and click Install.
- Once installed, you may need to restart Home Assistant.
📊 Step 3: Add the Timer Bar Card to Your Dashboard
Now that the card is installed, you can add it to your Irrigation View.
- Go to your irrigation view → Edit Dashboard → Add Card.
- Good to use a vertical stack card to organize your dashboard and keep your zones together in either desctop, tablet, or mobile views.
- Select Manual Card and add the following YAML configuration to show your irrigation timer:
type: custom:timer-bar-card
entities:
  - entity: timer.irrigation_zone1
    name: Drop
    icon: mdi:water-circle
    show_icon: true
    state_color: true
    tap_action:
      action: call-service
      service: script.irrigation_zone1
🔄 Step 4: Customize the Card
- You can adjust the appearance of the card to suit your preferences:
- Title: Customize the title for each zone.
- Colors: Change the color of the progress bar based on the timer status (active or completed).
- Icons: Add relevant icons to the zones (e.g., water droplet or plant).
⚠️ Important Notes:
As shown in the example above, a custom script is used to start and stop the timer instead of relying on the default “tapping action,” which cycles through the states: start, pause, and idle. This approach provides more control and ensures that your automations behave consistently
🔁 Step 5: Create the Script
- Navigate to Settings → Automations & Scenes → Scripts tab.
- Click + Create Script and choose Create New Script.
🖊️ Script Configuration
- Name: irrigation_zone1
- Icon: 🕒 (Clock or Timer icon for better UI clarity)
- Mode:
Restart(orQueuedif you expect simultaneous calls)
✍️ YAML Code Example:
if:
  - condition: state
    entity_id: timer.irrigation_zone1
    state: idle
then:
  - metadata: {}
    data: {}
    target:
      entity_id: timer.irrigation_zone1
    action: timer.start
else:
  - metadata: {}
    data: {}
    target:
      entity_id: timer.irrigation_zone1
    action: timer.finish
🌟 Conclusion
With your irrigation system now integrated into Home Assistant, you can control it manually and rely on timers to stop watering automatically. This setup gives you flexibility and efficiency right at your fingertips.
From here, the possibilities are endless—automate watering based on schedules, weather forecasts, or even real-time soil moisture data. The next steps depend entirely on your needs and creativity. Happy automating, and may your garden always stay green!