
Zigbee controllers are a great way to automate your home, but what happens when they don’t update their status correctly? I have several Zigbee devices that are only triggered once every few months. Because of their sleep mode, they perform actions as expected but fail to report their actual status back to Zigbee2MQTT. As a result, Home Assistant continues to display outdated information, creating a mismatch between the system and reality.
In this article, you’ll find how to create HA script to nudge your Zigbee devices to update their true state in Home Assistant.
🔹 Steps to Create the Home Assistant Script
1️⃣ Identify Your Device’s MQTT Topic
Each Zigbee device in Zigbee2MQTT has a unique topic for sending and receiving commands.
- Open Zigbee2MQTT in Home Assistant.
- Go to Devices → Select your device.
- Note the MQTT topic (usually
zigbee2mqtt/<device_name>).
reality.
2️⃣ Create a Home Assistant Script
Navigate to Settings → Automations & Scenes → Scripts and create a new script.
Add “MQTT ‘Publish'” action to the script:
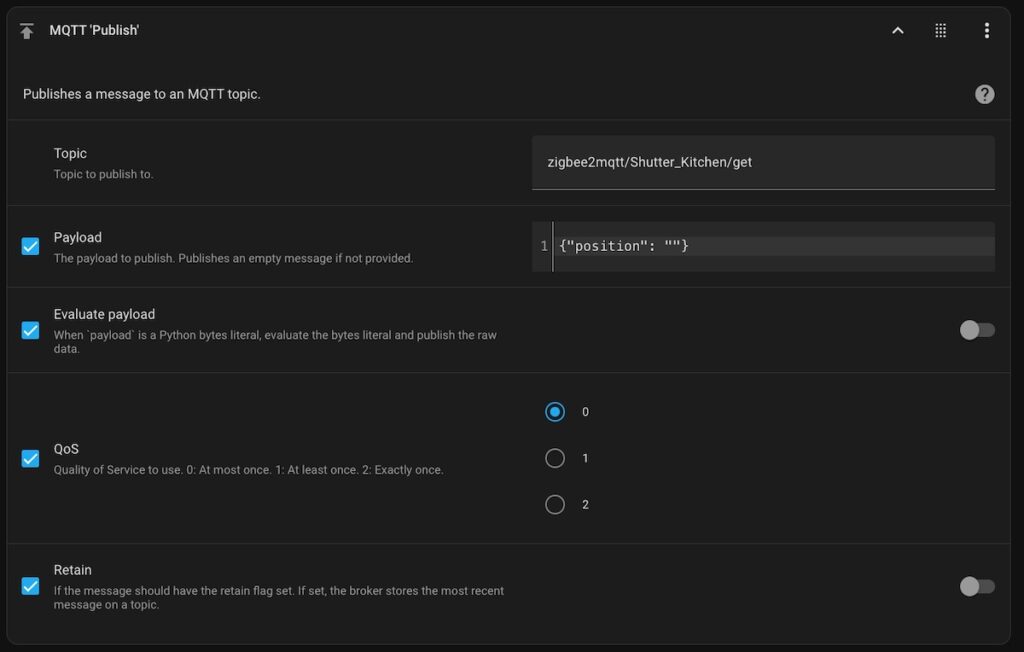
The topic follows the format “zigbee2mqtt/Your_Device_Name/get”, where “Your_Device_Name” should be replaced with the actual name of your device from the previous step. In this case, “Shutter_Kitchen” serves as an example.
The ‘Payload’ represents the exposed state of your device. However, not all states can be used—only those that are refreshable from Zigbee2MQTT. Otherwise, statuses of your device won’t be refreshed and you can find an error in ZigBee2MQTT logs.
Hence, follow the next steps to distinguish a proper state:
- Open Zigbee2MQTT in Home Assistant.
- Go to Devices → Select your device → Exposes.

A proper state includes a ‘Refresh’ button in the Zigbee2MQTT web interface.
In my case, the ‘Payload’ is {“position”: “”}, but you should replace ‘position’ with the appropriate state name for your device.
There is the yaml version of the script:
sequence:
  - action: mqtt.publish
    metadata: {}
    data:
      evaluate_payload: false
      qos: "0"
      retain: false
      topic: zigbee2mqtt/Shutter_Kitchen/get
      payload: "{\"position\": \"\"}"
alias: Your_script_name
description: ""
mode: queued
max: 10
⚠️ Important Notes:
- Click “SAVE”.
- Manually run the automation by clicking the “three-dot menu” → “RUN”.
3️⃣ Call the Script in an Automation
The best approach is to call your script after triggering the device action with a slight delay. The delay duration depends on how long the device takes to complete its action and can be fine-tuned through testing.
- Go to Settings → Automations & Scenes.
- Open your automation and add delay to your action by clicking “+ ADD ACTION” and choosing “Wait for time to pass (delay)”.
- Add calling your script
- by clicking “+ ADD ACTION” and choosing “Perform action” and typing your script name.
⚠️ Important Notes:
- Click “SAVE”.
- Manually run the action in your automation by clicking the “three-dot menu” → “RUN”.